My Organisations
If you are a part of a SmartyFile organisation, you will see that organisation listed on your My Organisations page. If you are a part of multiple organisations, each organisation will be listed on this same screen.
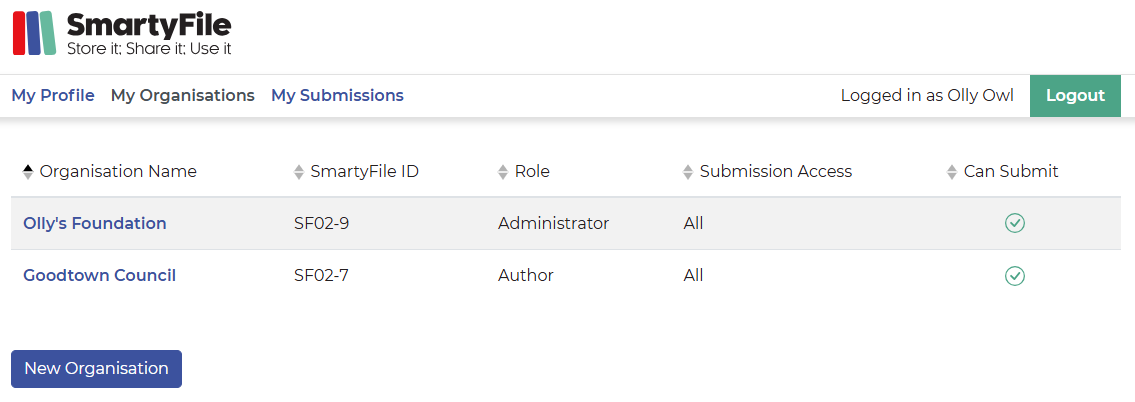
Selecting the name of an organisation will take you to the OrgHQ for that organisation. What you see in the OrgHQ will depend on your user role.
Info: For help on how to join or create an organisation profile, please see here.
Table of contents
Organisation details
If you are an Administrator, you have the ability to provide and edit details about your organisation. These details can be used to auto-fill into SmartyGrants forms by you or your team members when completing submissions.
From My Organisations, select the name of the organisation, and once on the OrgHQ page, select the pencil icon to add or edit details:
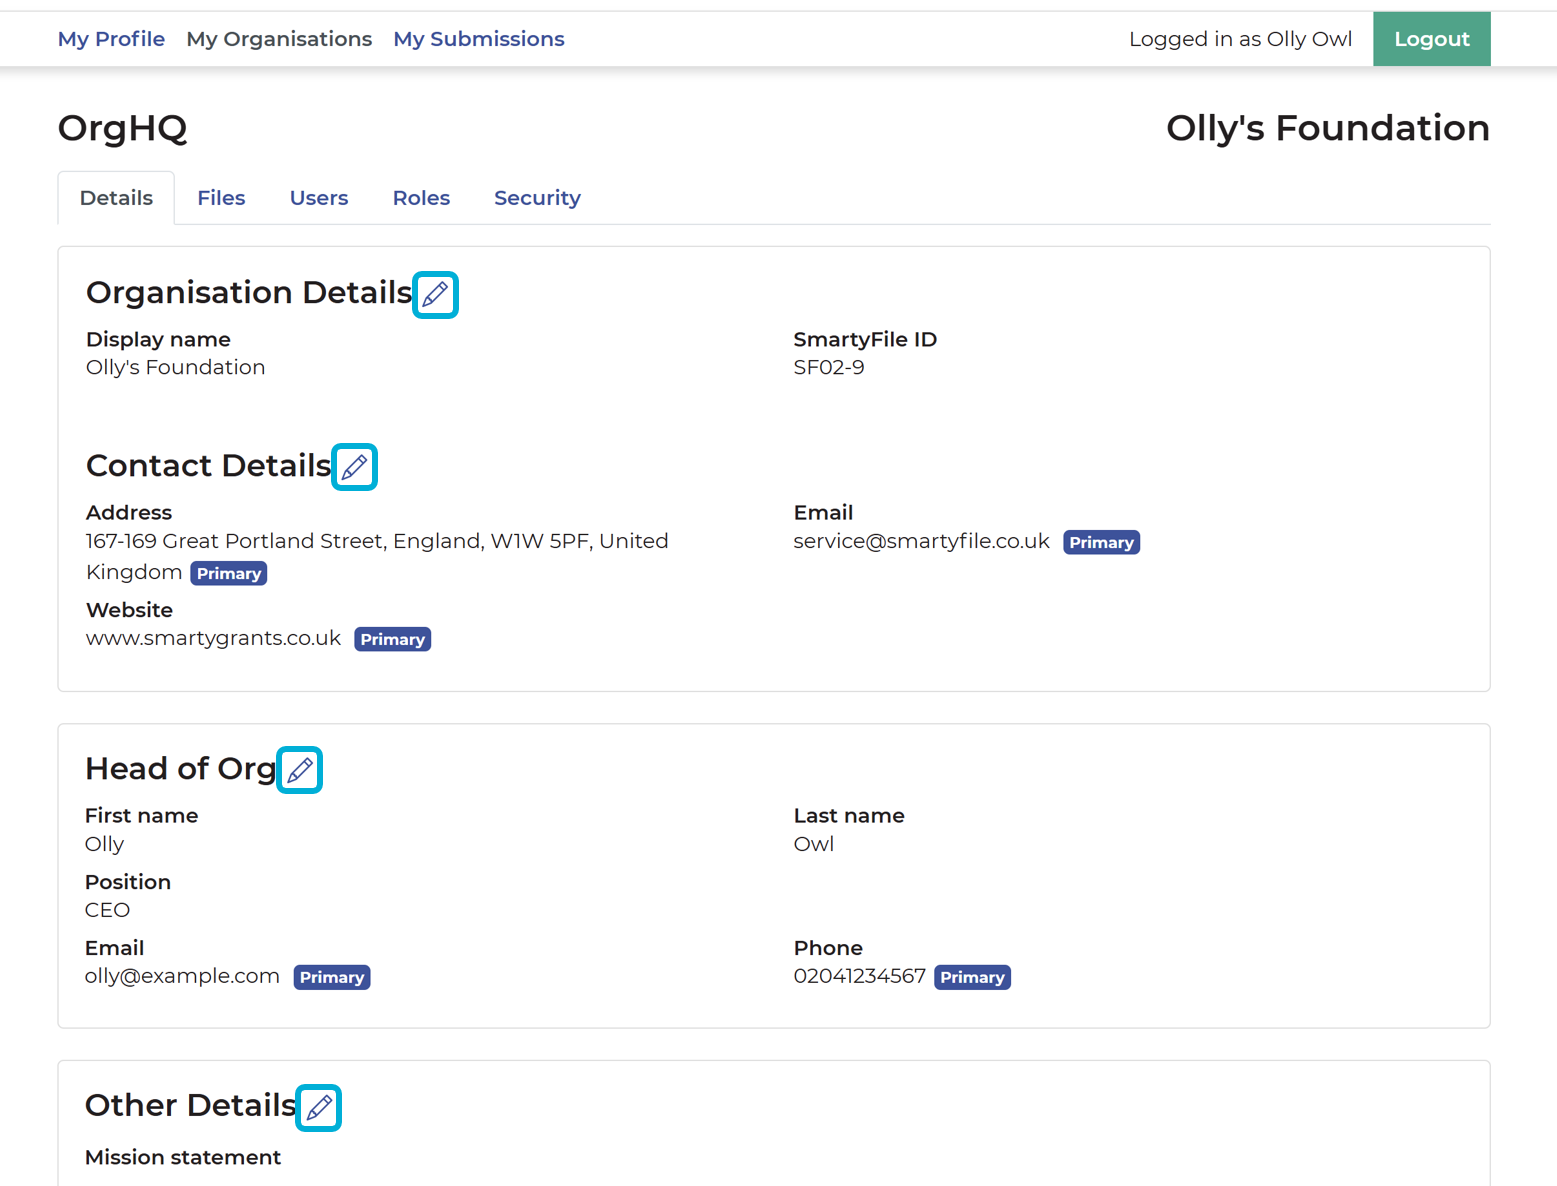
Organisation Details
Contact Details
Head of Org
Mission statement
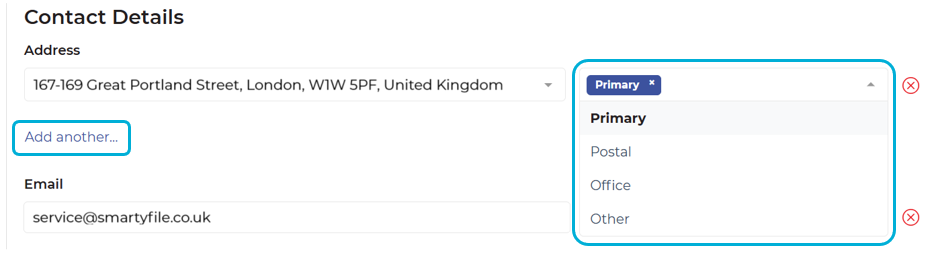
You can tag any set of contact details as Primary, Postal, Office or Other, depending on their purpose.
Select Add another to add additional contact details.
Navigate: Back to top | Accessing SmartyFile | My Profile | My Submissions
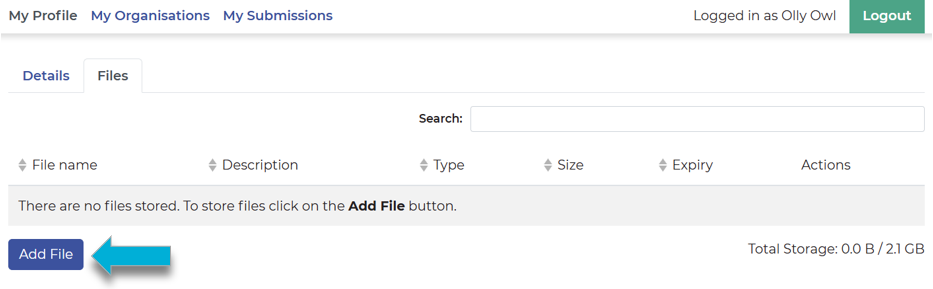
File Storage
Files can be centrally stored in your organisation profile. These files can then be easily accessed by applicants completing any attachment fields or questions in forms powered by SmartyGrants.
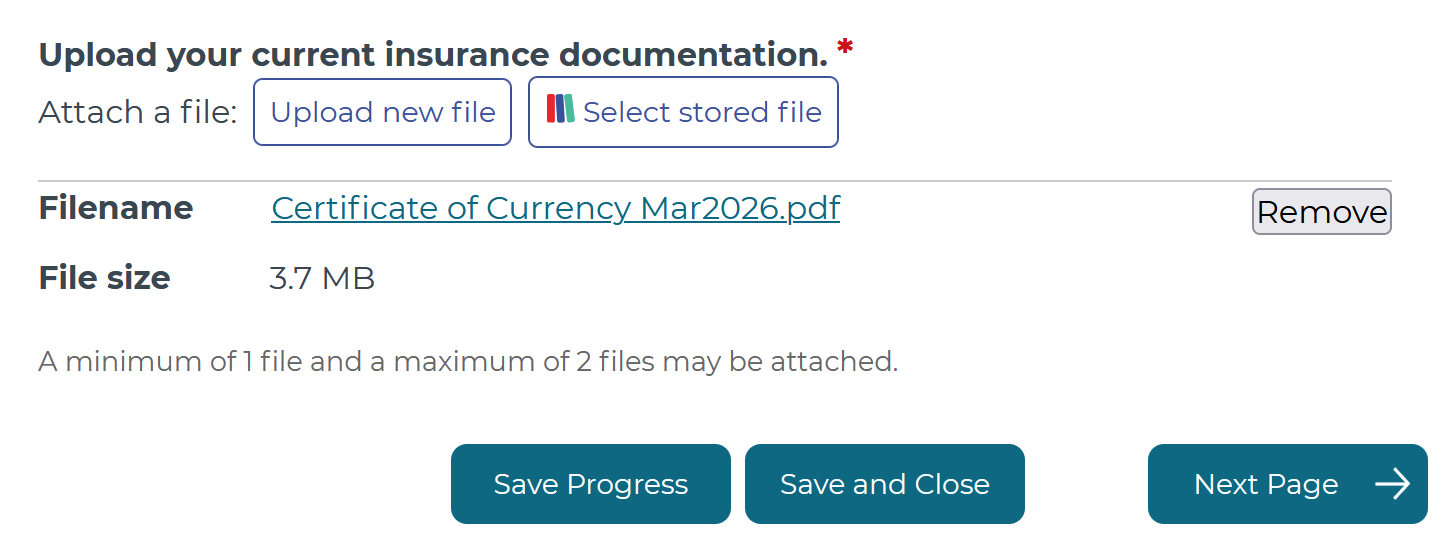
Only Administrators have access to upload and manage files, whilst those with Create/Start Items permissions can access those files when completing a form. Administrators can include a document expiry date on a file so they are notified as documents are approaching expiration.
Organisations will have a maximum of 2GB of file storage. If this storage limit is reached, users will be able to delete any files that are no longer required or whose expiry date has passed.
The maximum individual file size that can be uploaded is 25MB and must be of a file type supported by SmartyGrants. For a full list of file types supported by SmartyGrants, please see here.
Upload files
From My Organisation, select the name of the organisation, and then select the Files tab. Then:
Select the Add File button.
Select the file you would like to upload to SmartyFile from your device's file browser by selecting Browse.
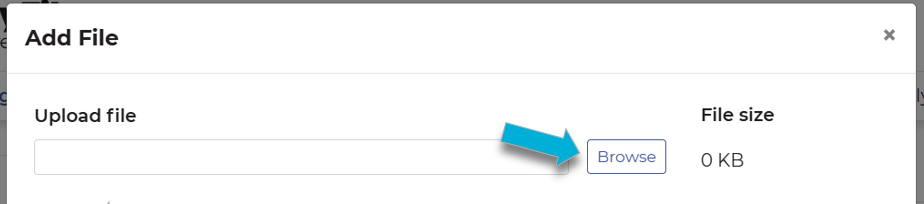
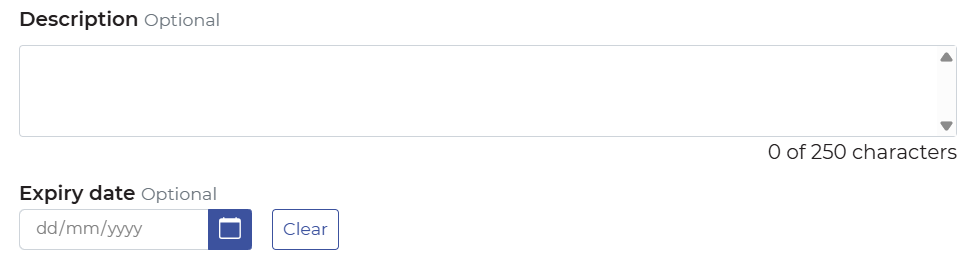
You can add an optional description and expiry date.
Select the Add button.

Edit files
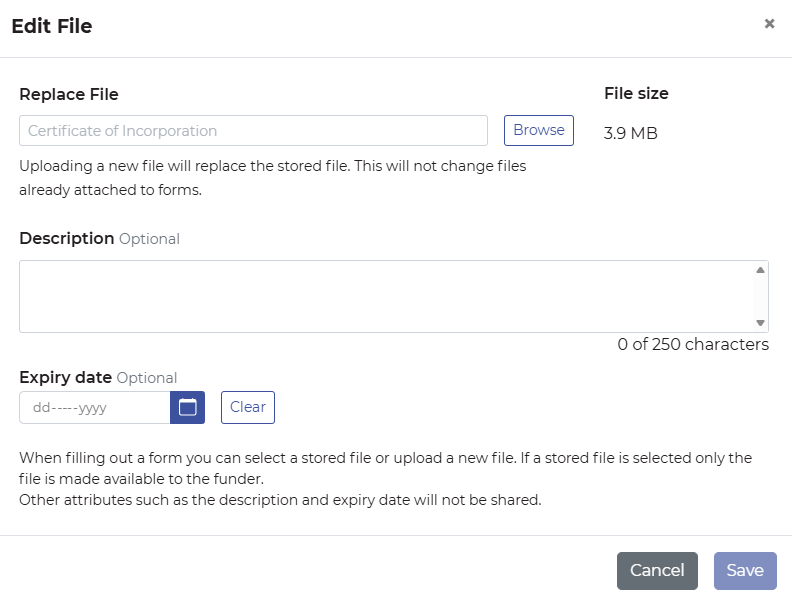
From My Organisation, select the name of the organisation, and then select the Files tab. Then, select the pencil icon next to the file you wish to edit.

From the pop-up window, you can replace the file with a new file, update the description, and update the expiry date. Once you’ve made changes, select Save.
Using files in forms
Once files have been uploaded into SmartyFile, you will have them as an option when filling out a form from funders powered by SmartyGrants.
Note: When completing a form that is assigned to an organisation, you will only be able to select files stored within that organisation profile. If your submission is not assigned to an organisation, only your personal stored files will be available.
To provide a SmartyFile file when filling out a form:
Select the Select stored file button.
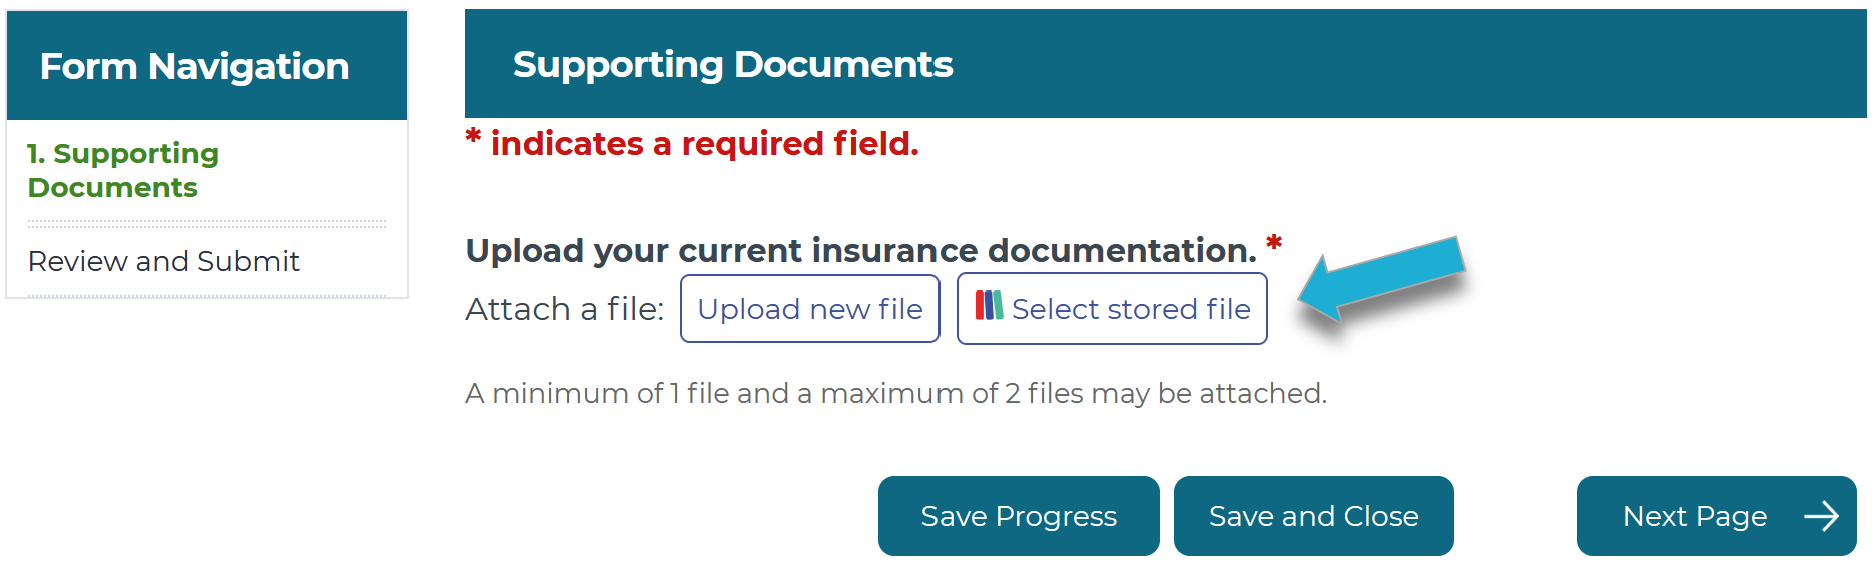
Select the file you would like to upload from the available options by selecting the checkbox to the left of the file name.
You can search for a file by name using the Search field in the top right.
If the file you are looking for is not shown, please confirm that it has been uploaded correctly, and the expiry date (if set) has not passed.
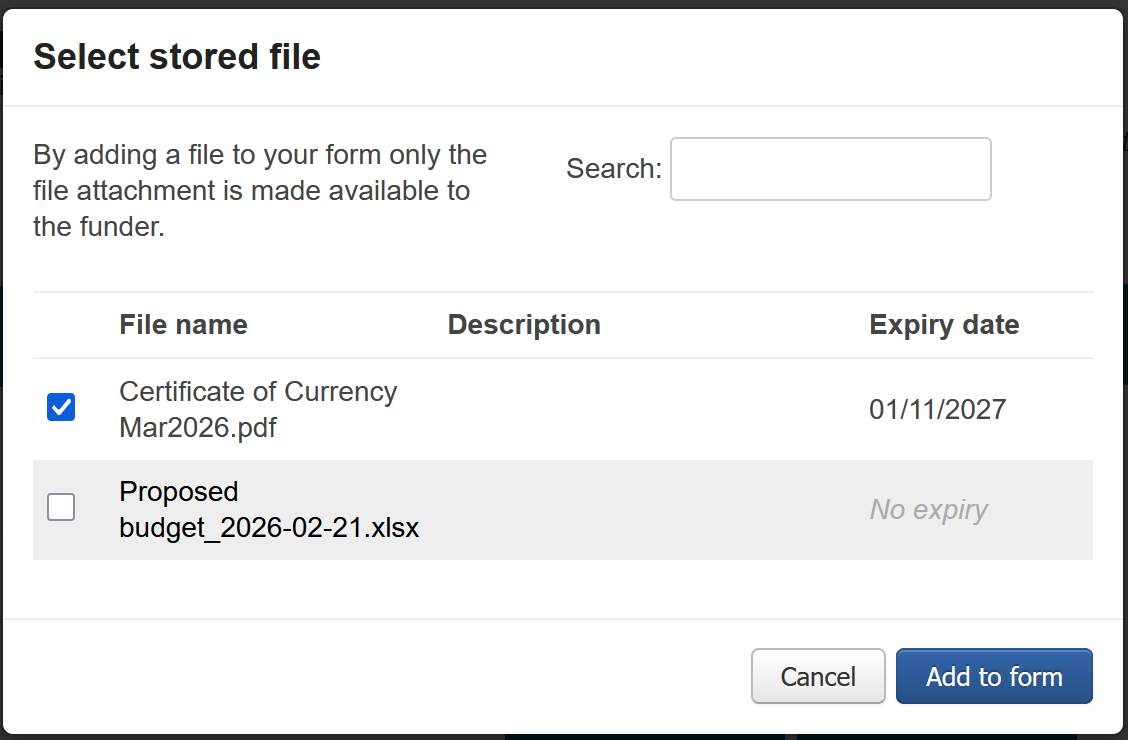
Once you have selected the file you wish to upload into the form, select Add to form.

Once the button has been selected, the file will have been uploaded into the form.
Navigate: Back to top | Accessing SmartyFile | My Profile | My Submissions
User roles
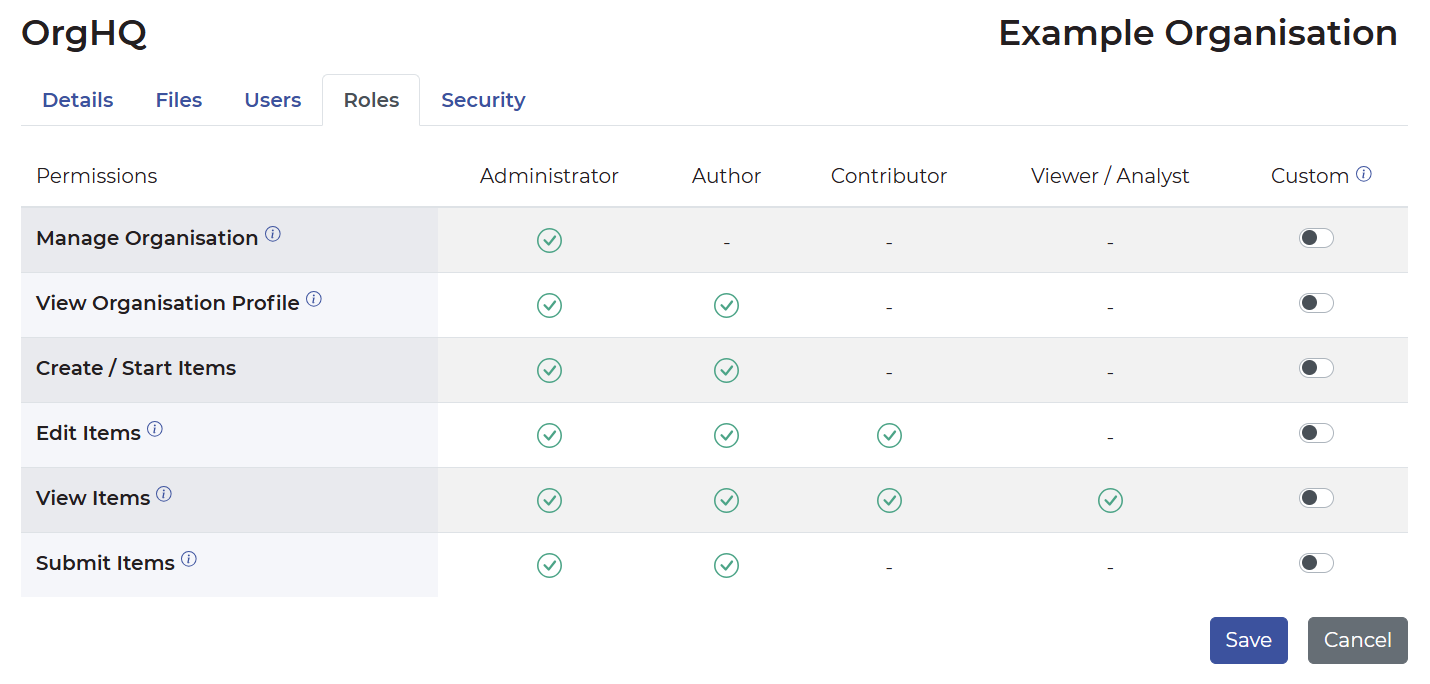
There are four default (and one custom) levels of access that can be assigned to users:
Administrator.
Author.
Contributor.
Viewer/Analyst.
Custom.
The functions available to each role are outlined below.
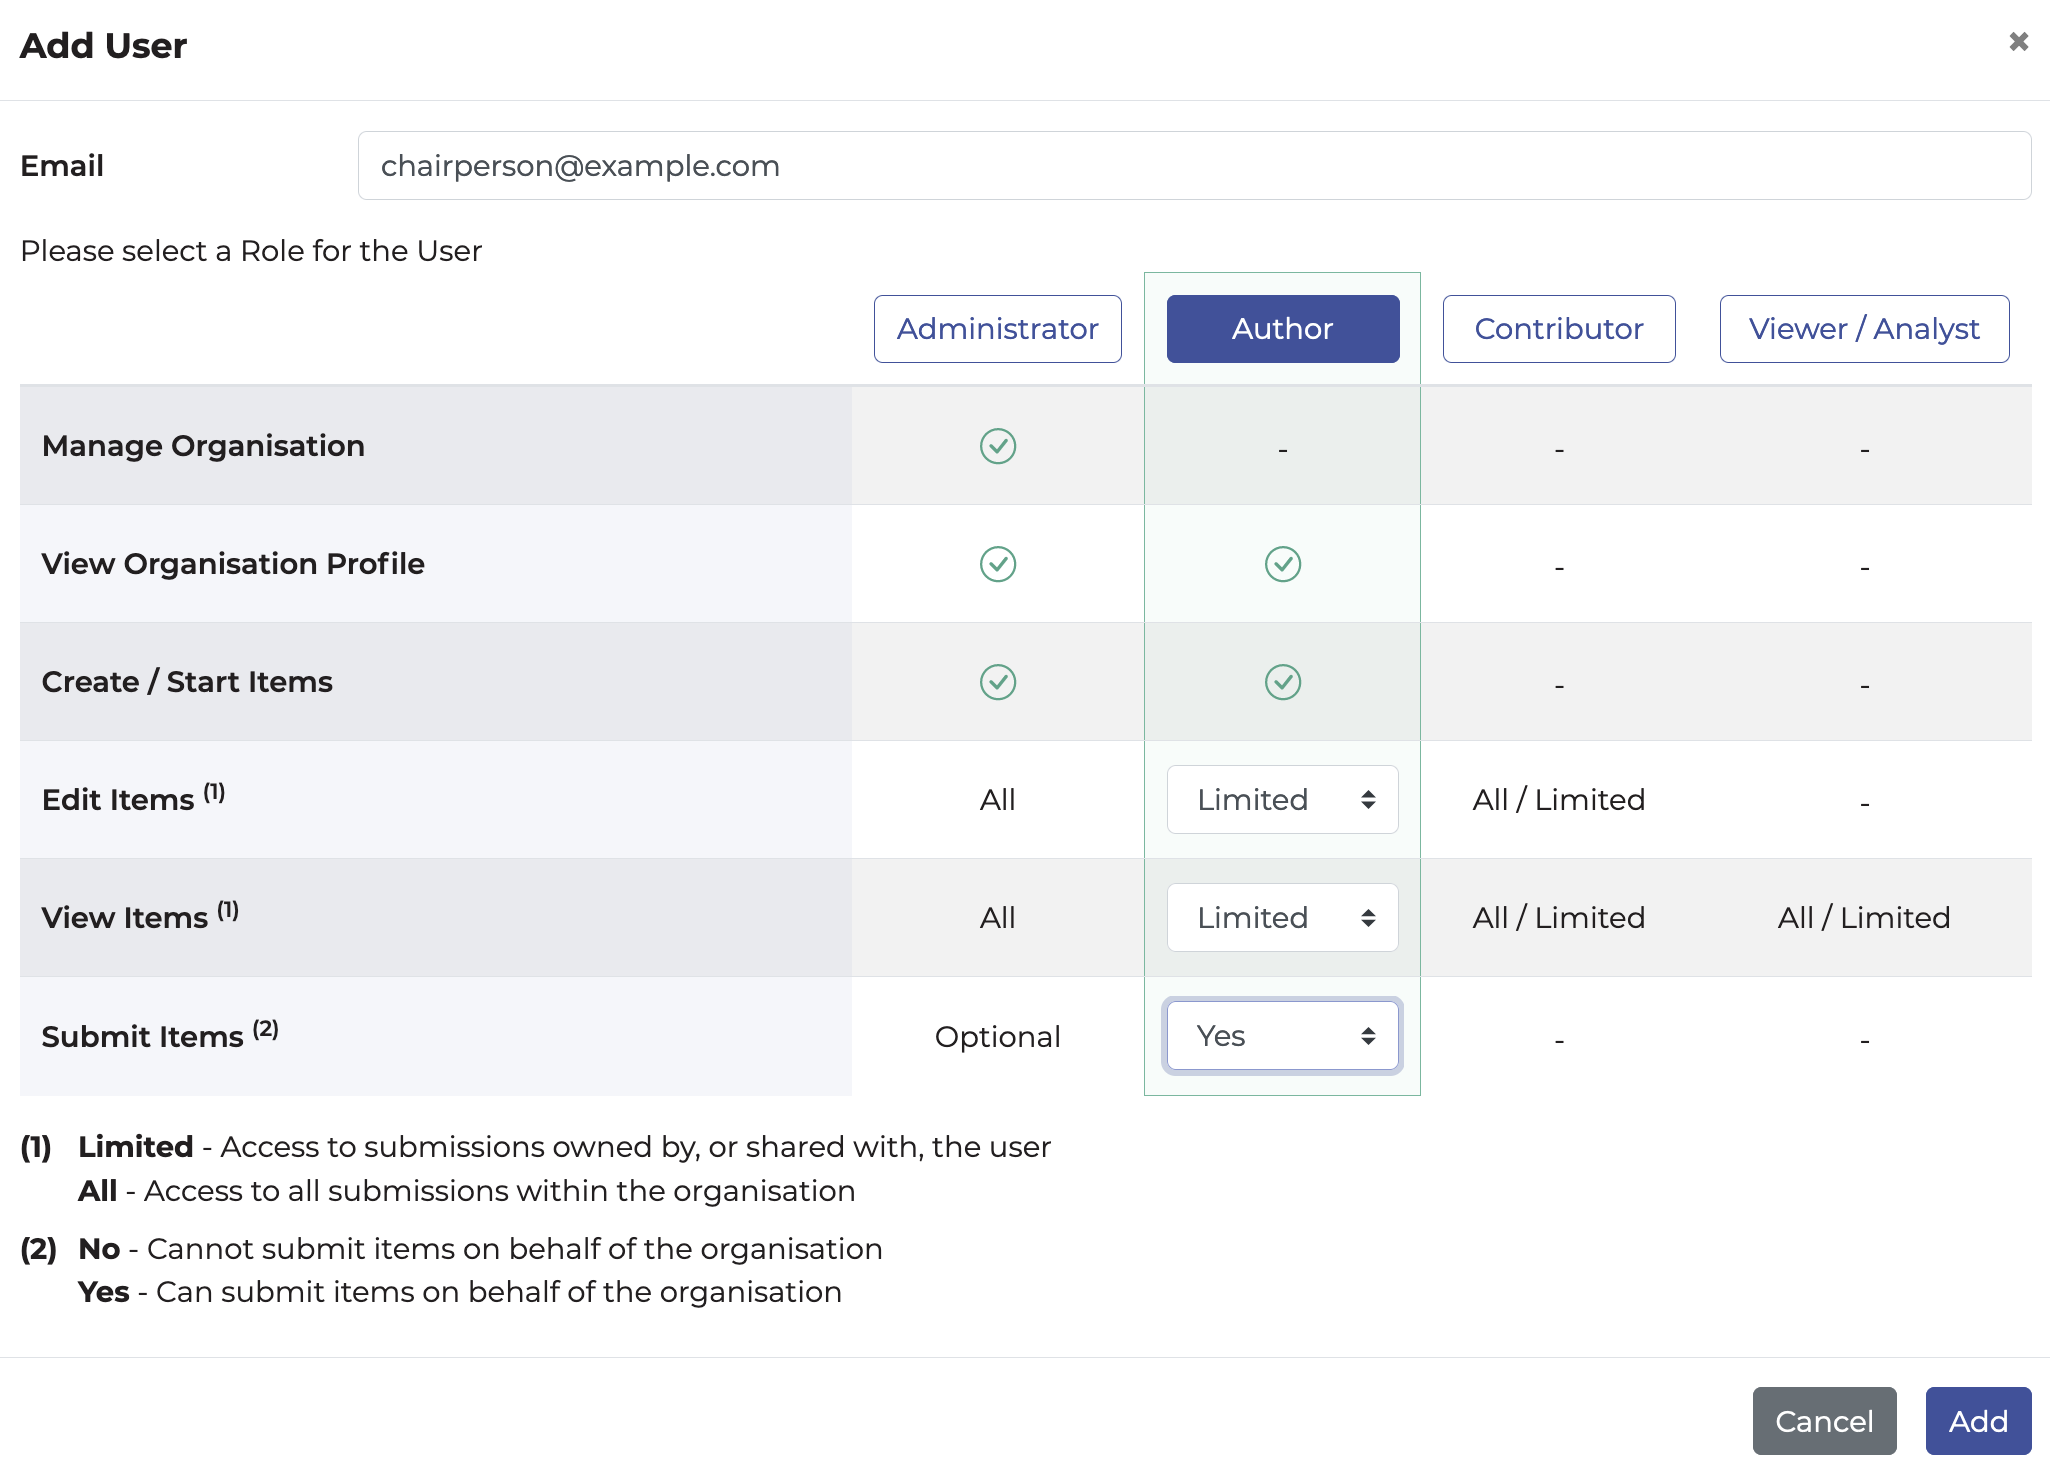
When assigning a role to a user, Administrators can define their access levels and whether they have permission to make submissions.
Administrators also have the ability to create a custom role for their organisation if none of the default roles suit. To create a custom role, toggle the permissions you wish to enable for that role. They will appear green if that function is active.
About permissions
Permission | Description | Default role and setting* | Notes |
|---|---|---|---|
Manage Organisation | Permissions to manage the organisation - including organisation details, files, and user access. |
| |
View Organisation Profile | Permissions to view the organisation - including organisation details, files, and user access. |
|
|
Create / Start Items | Permissions to start a new submission on behalf of the organisation profile |
| |
Edit Items | Permissions to fill out forms within submissions. Note this does not include the ability to change submission ownership. |
|
|
View Items | Permissions to view forms within submissions. |
|
|
Submit Items | Permissions to submit forms. |
|
|
*Note: ‘Default role and setting’ only refers to system defaults tied to each permission. Some of these can be customised to suit your organisation’s needs. For a full breakdown of each user role, including the customisation options, please see our User Role Permissions page.
Navigate: Back to top | Accessing SmartyFile | My Profile | My Submissions
Managing users
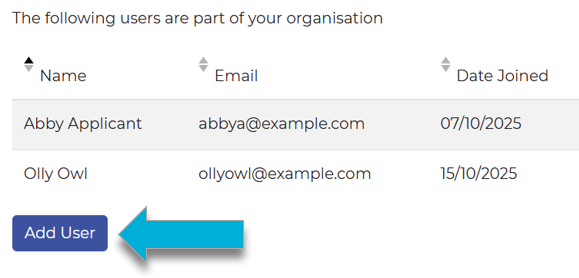
To see a full list of users in your organisation, select My Organisations, then select the name of your organisation. Then, from the OrgHQ page, select the Users tab.
Only an Administrator has access to add, edit, approve or remove users.
Add user
Select My Organisations, then select the name of your organisation.
From the OrgHQ page, select the Users tab.
Select the Add User button.
In this window:
Enter the email address of the user you wish to add,
Select the user role you wish them to have, and if required, adjust their permissions to edit, view, or submit items.
Select Add.
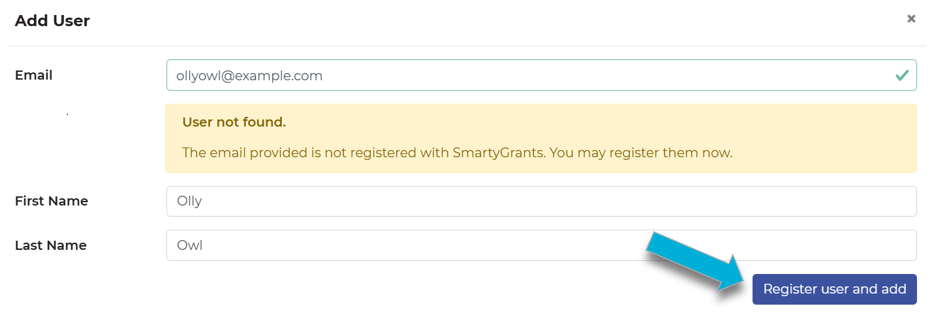
If you attempt to add a user who does not have a SmartyGrants user account, you will receive additional prompts to set up an account for them. Once you have entered their first name, last name and selected their user role, select Register user and add. The user will receive an account activation email delivered to their email address.
Edit user
Select My Organisations, then select the name of your organisation.
From the OrgHQ page, select the Users tab.
Under Actions, select the pencil icon.

In the pop-up window, you can modify the roles and permissions for the user.
Select Update to save your changes.

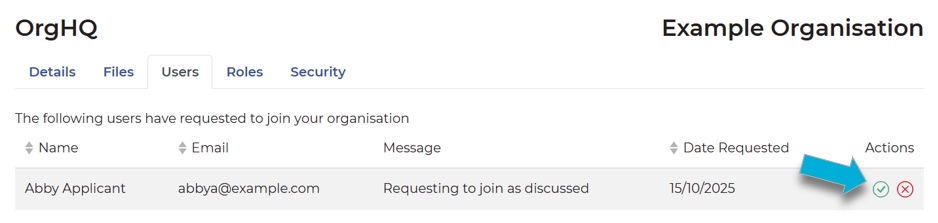
Approve user request
Select My Organisations, then select the name of your organisation.
From the OrgHQ page, select the Users tab.
Under Actions, select the checkmark icon.
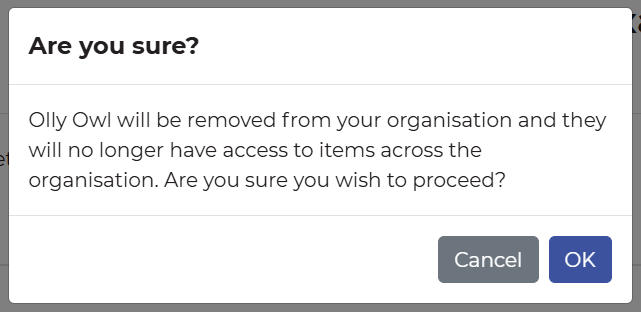
Remove user
Select My Organisations, then select the name of your organisation.
From the OrgHQ page, select the Users tab.
Under Actions, select the X icon.
In the pop-up window, once you have checked that you are removing the correct user, select OK.

Navigate: Back to top | Accessing SmartyFile | My Profile | My Submissions
Pre-filling information into SmartyGrants forms
You can pre-fill information using details from your organisation’s profile (OrgHQ) or from your individual profile (My Profile) when completing a submission through any funder using SmartyGrants.
You will have the option to pre-fill the organisation contact information if requested, when clicking into a pre-fillable form field.
Pre-fill organisation details (Org HQ)
In order for pre-fill to work, you will first need to ensure there are details saved for your organisation in SmartyFile.
Only Administrators are able to fill in or amend this information:
Go to My Organisations.
Select the name of your organisation.
You can select the pencil icon next to fields to add or edit information.
When you next log in to SmartyGrants to start or continue a submission, as long as you’ve selected that you are applying on behalf of the same organisation shown in SmartyFile, you will see the details available to pre-fill.
Note: Pre-fill is optional. You can still manually update any field - i.e., override the pre-fill results with your own answer - if you want to.

Pre-fill individual details
For more information on pre-filling your personal details, see here.
Navigate: Back to top | Accessing SmartyFile | My Profile | My Submissions
Multi-factor authentication (MFA)
As an extra layer of security, you may require all users who belong to your organisation profile to use an authenticator mobile app (such as Google Authenticator or Authy) each time they log in. Only an Administrator can enable or disable this setting.
Enable MFA
To enable multi-factor authentication for all users, as an Administrator:
Under My Organisations, select the name of your organisation.
Select the Security tab.
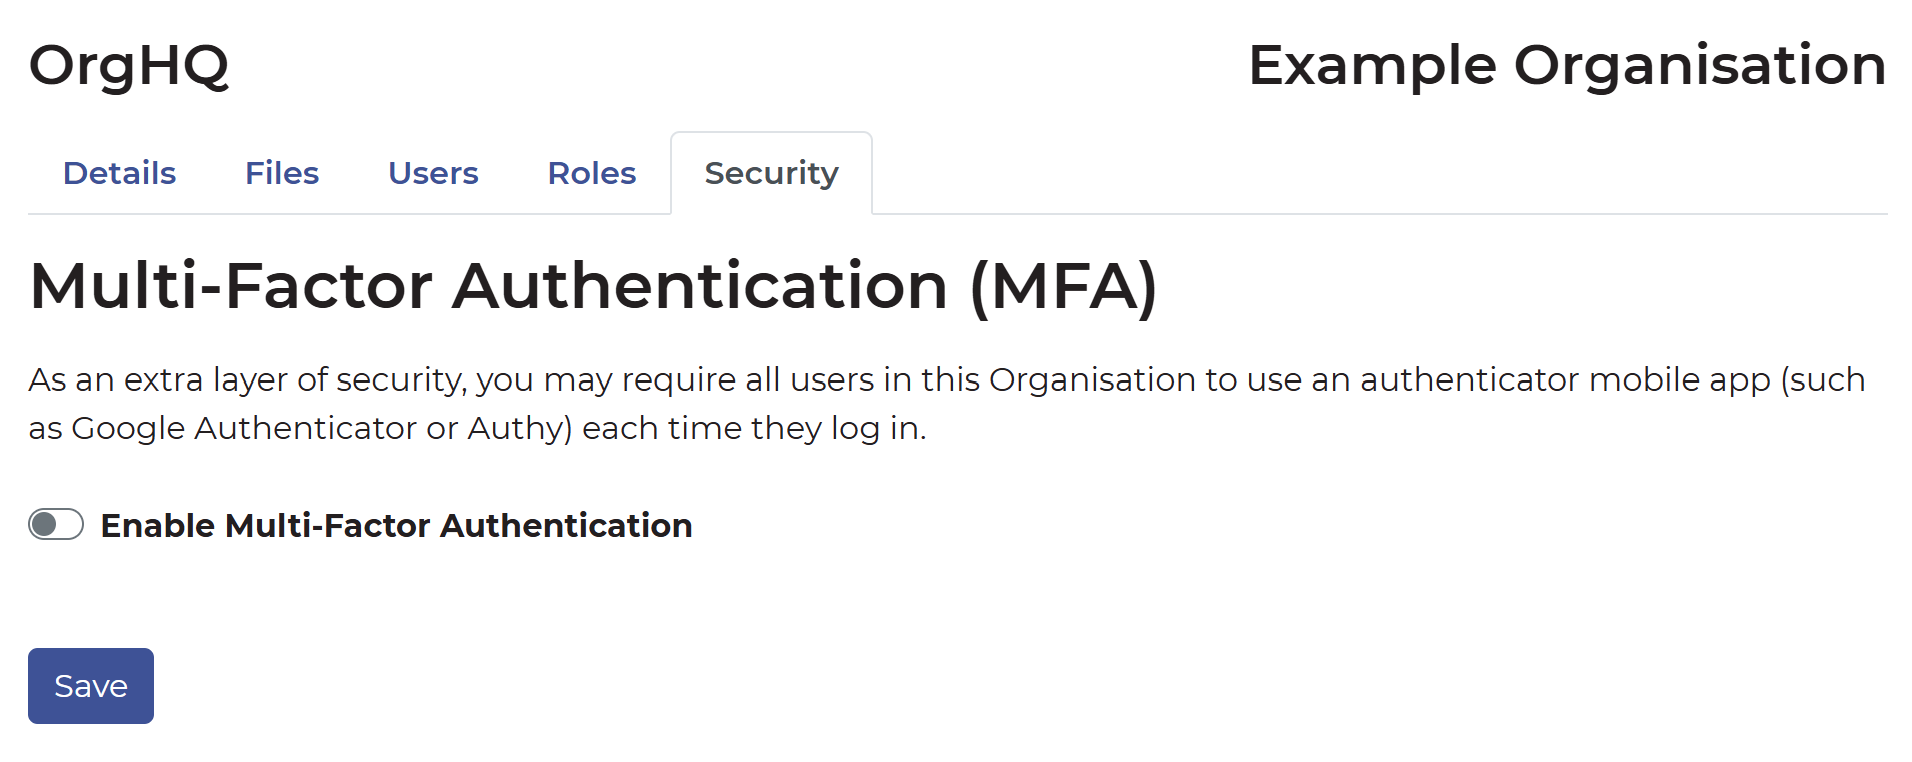
Select the toggle for Enable Multi-Factor Authentication. It will show purple when enabled.

Select Save.
When any of your users next log in to your organisation, they will be required to either set up MFA or log in using their existing MFA configuration.
More information on what MFA looks like from a user’s perspective can be found here.
Reset MFA
On occasion, a user may need their multi-factor authentication device reset. An Administrator can reset the existing MFA for a user from the Edit User screen.

MFA as a user
To see what MFA looks like for your users, see here.
Navigate: Back to top | Accessing SmartyFile | My Profile | My Submissions